Hi everyone, hope you’re doing good.
This is the second post in a series of blog posts exploring the potential of AutoUpgrade-Composer, as we may have dozens of scenarios.
In this blog post, we’ll perform a straightforward operation, with some customization.
Current environment:
- SID: TST1
- Source Home (current RU): /u01/app/oracle/product/19.22/dbhome_1
- Edition: Enterprise
We will be targeting the N-2 RU as of now (19.25).
So, first we’ll access AutoUpgrade-Composer: https://autoupgrade-composer.com
You will notice some visual changes since my last blog post. Now, on the right side, we will always have the Generated Config visible – you can scroll down the left part of the tool, however, Generated Config will be always visible, and, as it’s a dynamic field, whatever changes you perform composing your configuration file, Generated Config is automatically updated.
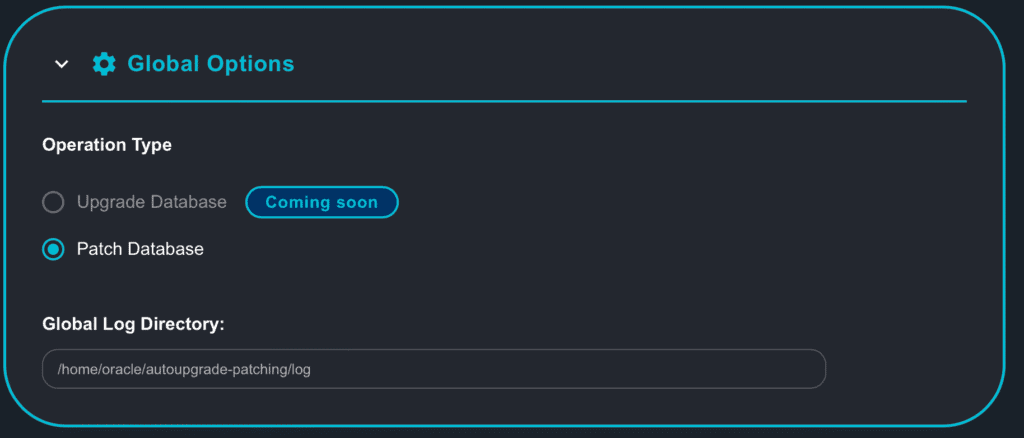
In the section Global Options, we have only the option to Patch Database available (remember, AutoUpgrade-Composer is in BETA version and I’m expecting to release the full capabilities by mid-June). We will not change the Global Log Directory, but feel free to change it in your environment:
After Patch Database is selected, let’s go to the section below: Database Configurations.
In the Basic Information tab, we will choose the Deploy mode. Ideally, you should choose Analyze. But as we are running in a lab environment, we are good to go with Deploy mode directly.
We will change some parameters. The Target Home will be the new Home to be installed for DB being patched.
- SID: TST1
- Source Home: /u01/app/oracle/product/19.22/dbhome_1
- Target Home: /u01/app/oracle/product/19.25/TST1

Now, go to the Patch Content tab. Here, we will keep RU and OPATCH selected, but we will choose a different RU than the latest: 19.25. This means that we are targeting an OPatch utility update and to applying the RU. In my environment, I changed the Patch Folder, where is the directory on the server where I have the patch files:
- Patch Folder: /u01/software

Perfect! Now, go to the Download Settings tab:
Let’s enable the option to download the patch files. I will explain about Keystore shortly. As this is just an example, I don’t want to change the location of my keystore.
Important: your server must have access to the Internet; otherwise, this step will fail.

Now, go to the Additional Options tab:
Note that Restoration is selected. This means that if you are running on Enterprise Edition and on ARCHIVELOG mode, a Guaranteed Restore Point will be created as part of patching operation. By default, the GRP created will not be dropped. You can see that the next option is to drop the GRP once patching completes. Let’s also enable it.

Perfect! Now, in the right side of the page/tool, we have the Generated Config.
You have two options: download the config file, or copy the config to clipboard. You will need the info you are seeing below to use in your AutoUpgrade execution.
If you remember the Generated Config from the first post, look how cool the config now is. If you noticed, we have some different parameters comparing with the previous config we generated in the first post.
The changed/added parameters are:
global.keystore=/home/oracle/autoupgrade/keystore
patch1.drop_grp_after_patching=YES
patch1.patch=RU:19.25,OPATCH
patch1.download=YES

Perfect! As we have selected to download the patches, In the section below, there is the instruction on how to setup the AutoUpgrade Keystore with the MOS credentials.
AutoUpgrade Keystore is software keystore used exclusively by AutoUpgrade to store passwords, and other sensitive information – in our case, the Metalink/MOS credentials.

In the section below there is the instruction on how to run the AutoUpgrade.
Note that it’s always recommended to run the Analyze mode first.

Let’s now check our environment. We’ll start by checking the processes:
[oracle@upgrade-lab ~]$ ps -ef |grep -v 'grep' | grep 'pmon'
oracle   3689045       1  0 18:11 ?        00:00:00 ora_pmon_TST1
Now, from inside the DB, let’s check some more information:
set lines 120
col banner_full for a80

select banner_full from v$version;

BANNER_FULL
--------------------------------------------------------------------------------
Oracle Database 19c Enterprise Edition Release 19.0.0.0.0 - Production
Version 19.22.0.0.0
Now we will use Mike Dietrich’s script check_patches_19.sql, but only run the first query:
SET LINESIZE 500
SET PAGESIZE 1000
SET SERVEROUT ON
SET LONG 2000000

COLUMN action_time FORMAT A20
COLUMN action FORMAT A10
COLUMN status FORMAT A10
COLUMN description FORMAT A60
COLUMN source_version FORMAT A13
COLUMN target_version FORMAT A13
COLUMN version_full FORMAT A13
COLUMN comp_id FORMAT A8


alter session set "_exclude_seed_cdb_view"=FALSE;

select CON_ID,
        TO_CHAR(action_time, 'YYYY-MM-DD') AS action_time,
        PATCH_ID,
        PATCH_TYPE,
        ACTION,
        DESCRIPTION,
        SOURCE_VERSION,
        TARGET_VERSION
   from CDB_REGISTRY_SQLPATCH
  order by CON_ID, action_time, patch_id;


    CON_ID ACTION_TIME            PATCH_ID PATCH_TYPE ACTION     DESCRIPTION                                                  SOURCE_VERSIO TARGET_VERSIO
---------- -------------------- ---------- ---------- ---------- ------------------------------------------------------------ ------------- -------------
         0 2025-04-30             35943157 RU         APPLY      Database Release Update : 19.22.0.0.240116 (35943157)        19.1.0.0.0    19.22.0.0.0
We can confirm that the DB is running on version 19.22.
We need to make sure we have the latest version of AutoUpgrade. You can always check the AutoUpgrade Tool Reference Note (Doc ID 2485457.1). You can also download it directly from Oracle.com as mentioned on Mike’s blog post: Download AutoUpgrade directly from oracle.com. Sometimes you might notice some delay in the release of the latest AutoUpgrade version on Oracle.com compared to the version available in the My Oracle Support Note mentioned above. This week we had an Oracle ACE Product Overview Session: AutoUpgrade Patching and Other Cool Features with Mike and his team – Daniel, Alex and Rodrigo. I mentioned during the session that the “button” to download AutoUpgrade directly from OTN was incorrect: the label was pointing to 25.1, even though the version being downloaded was actually 25.2. I saw it that now is fixed. Thank you Mike!

After uploading the latest version of AutoUpgrade to my server, let’s confirm the version:
java -jar autoupgrade.jar -version
build.version 25.3.250509
build.date 2025/05/09 02:53:51 +0000
build.hash 3110a3d32
build.hash_date 2025/05/05 19:43:04 +0000
build.supported_target_versions 12.2,18,19,21,23
build.type production
build.label (HEAD, tag: v25.3, origin/stable_devel, stable_devel)
build.MOS_NOTE 2485457.1
build.MOS_LINK https://support.oracle.com/epmos/faces/DocumentDisplay?id=2485457.1
Great!
We need to create a Config File for AutoUpgrade on our server. I created the file TST1.cfg, here is the content:
# Created by AutoUpgrade Composer
# Patch, ExecMode: Deploy

global.global_log_dir=/home/oracle/autoupgrade-patching/log
global.keystore=/home/oracle/autoupgrade/keystore

patch1.sid=TST1
patch1.log_dir=/home/oracle/autoupgrade-patching/TST1/log
patch1.source_home=/u01/app/oracle/product/19.22/dbhome_1
patch1.target_home=/u01/app/oracle/product/19.25/TST1
patch1.restoration=YES
patch1.drop_grp_after_patching=YES
patch1.folder=/u01/software
patch1.patch=RU:19.25,OPATCH
patch1.download=YES
We are almost ready to start the patching activity. Some important info to consider before triggering the patching:
Our Target Home will be /u01/app/oracle/product/19.25/TST1, note that the path /u01/app/oracle/product/19.25 must exist on the server. If not, AutoUpgrade process will fail. So, if you don’t have this path created, now is the time to create it:
mkdir -p /u01/app/oracle/product/19.25
We chose to download the patches for now and we set our Patch Folder to /u01/patch. If you remember, this is our Patch parameter for AutoUpgrade:
patch1.patch=RU:19.25,OPATCH
Even though we are going to download the OPATCH and RU:19.25, we must have the 19c Database Gold Image in the directory, as AutoUpgrade can’t download it for us.
Please confirm you have this file, if not, download it from the URL below and upload it to /u01/software on your server (or to the patch you specified in the patch1.patch parameter).
- Database Gold Image for 19c: LINUX.X64_193000_db_home.zip
Let’s check the content of the directory:
[oracle@upgrade-lab ~]$ ls -l /u01/software
total 5289624
-rw-r--r--. 1 oracle oinstall 3059705302 Apr 30 21:01 LINUX.X64_193000_db_home.zip
Great! Now, we need to setup our MOS credentials in the keystore. Since the keystore hasn’t been created yet, this process also will create it.
The first parameter you will be asked is to provide a password to keystore. Second parameter is to confirm the same password.
$ java -jar autoupgrade.jar -config /home/oracle/patch_TST1.cfg -patch -load_password
Processing config file ...

Starting AutoUpgrade Patching Password Loader - Type help for available options
Creating new AutoUpgrade Patching keystore - Password required
Enter password:
Enter password again:
AutoUpgrade Patching keystore was successfully created

MOS>
You can see that prompt is showing “MOS>”. If by any chance you see “TDE>”. You need to switch to MOS group. I will show below as an example.
First command is to switch to MOS group: group MOS
Second command is to add the user in the keystore: add -user myuser@mycompany.com, where myuser@mycompany.com must be your Oracle account that you used to login to MOS/Metalink.
Then you need to input the password for your MOS/Metalink account and then confirm.
You can now check if the credentials were loaded with no issues using the command: list.
You now can exit from -load_password mode. You will be asked if you want to save your keystore, type YES. Then you will be asked if you would like to convert the keystore to auto-login, this is good, so it will avoid to ask for your keystore password all the time, type YES again.
TDE> group MOS
MOS> add -user myuser@mycompany.com
Enter your secret/Password:
Re-enter your secret/Password:
MOS> list
MOS Credentials Loaded - Connection Successful
MOS> exit
Save the AutoUpgrade Patching keystore before exiting [YES|NO] ? YES
Convert the AutoUpgrade Patching keystore to auto-login [YES|NO] ? YES

AutoUpgrade Patching Password Loader finished - Exiting AutoUpgrade Patching
Perfect! We are ready to start! As we mentioned in the AutoUpgrade-Composer instructions on how to run AutoUpgrade. You will notice that AutoUpgrade first will download the files, then will validate the Database Gold Image. Let’s go:
$ java -jar autoupgrade.jar -config /home/oracle/patch_TST1.cfg -patch -mode deploy
AutoUpgrade Patching 25.3.250509 launched with default internal options
Processing config file ...
+-----------------------------------------+
| Starting AutoUpgrade Patching execution |
+-----------------------------------------+
1 Non-CDB(s) will be processed
Type 'help' to list console commands
patch>
Great! We can keep checking the jobs running using the command lsj, we can keep this command running automatically every 10 seconds:
patch> lsj -a 10
patch> +----+-------+---------+---------+-------+----------+-------+----------------+
|Job#|DB_NAME|    STAGE|OPERATION| STATUS|START_TIME|UPDATED|         MESSAGE|
+----+-------+---------+---------+-------+----------+-------+----------------+
| 100|   TST1|PRECHECKS|EXECUTING|RUNNING|  16:18:53| 4s ago|Executing Checks|
+----+-------+---------+---------+-------+----------+-------+----------------+
Total jobs 1

The command lsj is running every 10 seconds. PRESS ENTER TO EXIT
Our job ID is 100. If we would like to cancel the automatic execution, just press [ENTER].
You can also check the status of your job:
patch> status -job 100
Details

        Job No           100
        Oracle SID       TST1
        Start Time       25/05/16 16:18:53
        Elapsed (min):   1
        End time:        N/A

Logfiles

        Logs Base:    /home/oracle/autoupgrade-patching/TST1/log/TST1
        Job logs:     /home/oracle/autoupgrade-patching/TST1/log/TST1/100
        Stage logs:   /home/oracle/autoupgrade-patching/TST1/log/TST1/100/prechecks
        TimeZone:     /home/oracle/autoupgrade-patching/TST1/log/TST1/temp
        Remote Dirs:

Stages
        PENDING          <1 min
        GRP              <1 min
        PREACTIONS       <1 min
        PRECHECKS        ~1 min (RUNNING)
        PREFIXUPS
        EXTRACT
        DBTOOLS
        INSTALL
        OH_PATCHING
        OPTIONS
        ROOTSH
        DB_PATCHING
        POSTCHECKS
        POSTFIXUPS
        POSTACTIONS
        DROPGRP

Stage-Progress Per Container

        +--------+---------+
        |Database|PRECHECKS|
        +--------+---------+
        |    TST1|    97 % |
        +--------+---------+
As mentioned in the output above, the Log Directory (where you defined it in your Config File) is /home/oracle/autoupgrade-patching/TST1/log/TST1/100. You can check the log there, the name of file is autoupgrade_patching_YYYYMMDD_user.log, where YYYYMMDD is the current date. Below, a little piece from the log:
tail -8f autoupgrade_patching_20250516_user.log
2025-05-22 19:17:28.949 INFO The following patches will be used for this job:
/u01/software/LINUX.X64_193000_db_home.zip - Base Image - 19
/u01/software/p36912597_190000_Linux-x86-64.zip - Database Release Update : 19.25.0.0.241015 (36912597)
/u01/software/p6880880_190000_Linux-x86-64.zip - OPatch - 12.2.0.1.46
2025-05-22 19:17:29.424 INFO Guarantee Restore Point (GRP) successfully removed [TST1][AU_PATCHING_9212_TST11922000]
2025-05-22 19:17:32.045 INFO Guarantee Restore Point (GRP) successfully created [TST1][AU_PATCHING_9212_TST11922000]
2025-05-22 19:17:32.089 INFO No user defined actions were specified
2025-05-22 19:17:35.395 INFO Analyzing TST1, 60 checks will run using 8 threads
Great!
Now, you just need to wait!
This is the output of AutoUpgrade console:
Job 100 completed
------------------- Final Summary --------------------
Number of databases            [ 1 ]

Jobs finished                  [1]
Jobs failed                    [0]
Jobs restored                  [0]
Jobs pending                   [0]


Please check the summary report at:
/home/oracle/autoupgrade-patching/log/cfgtoollogs/patch/auto/status/status.html
/home/oracle/autoupgrade-patching/log/cfgtoollogs/patch/auto/status/status.log
So, it’s finished!
Let’s check the patches installed:
$ORACLE_HOME/OPatch/opatch lspatches
36912597;Database Release Update : 19.25.0.0.241015 (36912597)
29585399;OCW RELEASE UPDATE 19.3.0.0.0 (29585399)

OPatch succeeded.
The patches are there! Great!
Let’s check the Patches inside the DB:
SET LINESIZE 500
SET PAGESIZE 1000
SET SERVEROUT ON
SET LONG 2000000

COLUMN action_time FORMAT A20
COLUMN action FORMAT A10
COLUMN status FORMAT A10
COLUMN description FORMAT A60
COLUMN source_version FORMAT A13
COLUMN target_version FORMAT A13
COLUMN version_full FORMAT A13
COLUMN comp_id FORMAT A8


alter session set "_exclude_seed_cdb_view"=FALSE;

select CON_ID,
        TO_CHAR(action_time, 'YYYY-MM-DD') AS action_time,
        PATCH_ID,
        PATCH_TYPE,
        ACTION,
        DESCRIPTION,
        SOURCE_VERSION,
        TARGET_VERSION
   from CDB_REGISTRY_SQLPATCH
  order by CON_ID, action_time, patch_id;

    CON_ID ACTION_TIME            PATCH_ID PATCH_TYPE ACTION     DESCRIPTION                                                  SOURCE_VERSIO TARGET_VERSIO
---------- -------------------- ---------- ---------- ---------- ------------------------------------------------------------ ------------- -------------
         0 2025-04-30             35943157 RU         APPLY      Database Release Update : 19.22.0.0.240116 (35943157)        19.1.0.0.0    19.22.0.0.0
	 0 2025-05-22		  36912597 RU	      APPLY	 Database Release Update : 19.25.0.0.241015 (36912597)	      19.22.0.0.0   19.25.0.0.0
Perfect! We can see the DataPatch there for RU 19.25.
That’s it!
Hope it helps!
Peace!
Vinicius