Hi everyone,
I hope you are doing well.
The Issue
Recently I had an issue with my OCI Tenancy provided by the Oracle ACE Program where I was unable to create resources. I was only able to create ARM-based CPU Compute VMs – which is not helpful when you have Intel/AMD software installed 🙂
I am maintaining a VM where I have some Oracle Home binaries installed: 12.2, 19.x, etc. Not only binaries, I also have some DB’s (non-CDB, CDB) that I am performing test with the AutoUpgrade tool and to validate the configuration files generated by the AutoUpgrade-Composer. Indeed, I have been using this VM since I started the development of the AutoUpgrade-Composer.
Losing this VM would be bad as I have all my environment ready for tests whenever I have to test.
I also posted about restoring my entire block volume used as /u01 using Shell Script and oci-cli here:
How to Automate the Restore of /u01 on OCI Using Shell Script and oci-cli
Long story short, I asked the Oracle ACE Program to create another OCI account for me and they did. Thank you Cassandra for your support!
With the new account created, I had the challenge of moving the content of my /u01 to the new OCI tenancy.
I was able to create a TAR.GZ of my entire /u01, but the file was around 31GB of size. I could split this file into parts and transfer to my local computer and then upload to the new server, but I wonder if I could perform this transfer in a more efficient way.
The Solution: OCIFS
And here comes the usage of OCIFS Utility.
The OCIFS utility gives you the ability to mount Oracle Cloud Infrastructure Object Storage buckets as file systems. You can then manage the objects in the buckets as regular files and directories.
So, my idea was:
- OCI Console:
- Create an Object Storage Bucket in the old/current Tenancy.
- Steps in my ARM Compute VM:
- Mount my /u01 block volume.
- Create a TAR.GZ of my /u01.
- Install oci-cli.
- Install OCIFS Utility.
- Create a directory to be used for the Object Storage Bucket when mounted.
- Mount the Object Storage Bucket.
- Copy the TAR.GZ to Object Storage Bucket.
- Create a PAR (Pre-Authenticated Request) of the TAR.GZ inside my Object Storage Bucket.
- Steps in my new AMD VM (in my new Tenancy):
- Perform a wget (Download) of the TAR.GZ.
- Extract the TAR.GZ.
Steps that I will show on this blog post:
- Create an Object Storage Bucket.
- Install OCIFS Utility.
- Create a directory to be used for the Object Storage Bucket when mounted.
- Mount the Object Storage Bucket.
- Copy a file to Object Storage Bucket.
- Create a PAR (Pre-Authenticated Request) of the object inside my Object Storage Bucket.
- Perform a wget (Download) of the file with the previously PAR URL created.
Steps what I will not show on this blog post:
- Mount my /u01 block volume.
- Create a TAR.GZ of my /u01.
- Install oci-cli.
- Extract the TAR.GZ.
The focus here is not to show how to move the content of /u01 but to show how to install and use OCIFS.
To use OCIFS there are some Prerequisites:
- OCI Object Storage: Ensure the instance on which you plan to install OCIFS has access to, or can connect to, an existing Object Storage bucket that you want mounted.
- Local Disk Space: OCIFS consumes local disk space for caching Object Storage objects. OCIFS caches objects of a mounted Object Storage bucket in a directory that you can specify. For best performance, designate a local directory for caching that’s on a storage device with fast access time. Also, ensure that the cache directory is on a storage device with enough free space to host the entire contents of the mounted Object Storage bucket path, or, at minimum, all objects in the bucket to be read or written. OCIFS operations might fail if the storage device where the cache directory is located gets full. For more information on OCIFS caching, see OCIFS Cache Options.
- CLI Configuration file: By default, OCIFS uses the API key-based authentication method to authenticate Object Storage. This authentication method requires a CLI configuration file that contains OCIFS-specific entries. For information on how to set up the configuration file for OCIFS, see API Key-Based Authentication. That’s the reason I recommended you to install the oci-cli. You can check here how to do it: Installing the Oracle Cloud Infrastructure CLI on Oracle Linux 8
The Object Storage Bucket creation
OK, so, let’s start creating our Object Storage Bucket.
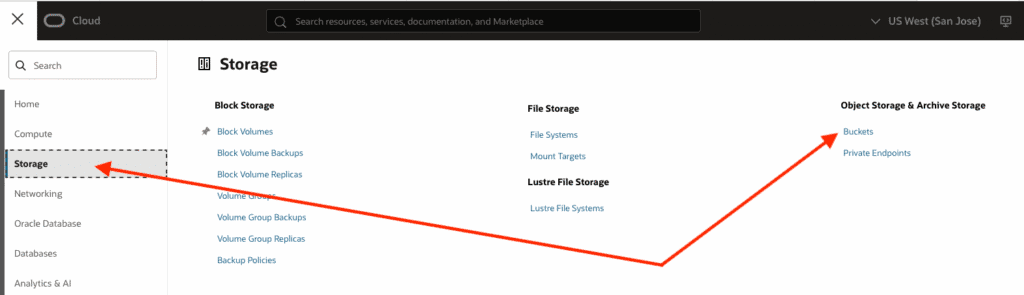
Click in the “hamburger” button:

Then, click in Storage and then click in Buckets:
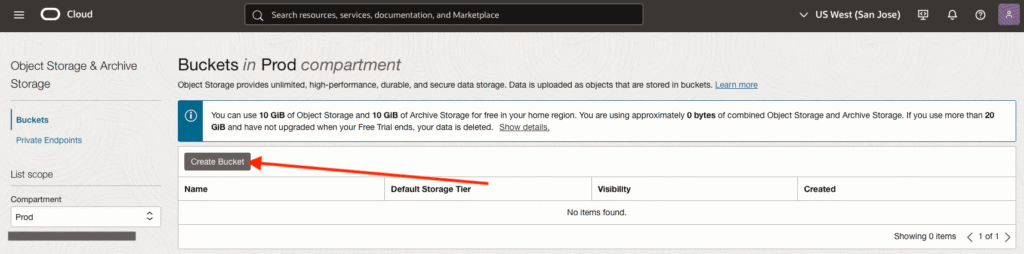
You can choose the Compartment where you’d like to create the bucket. Then, click in the Create Bucket button:
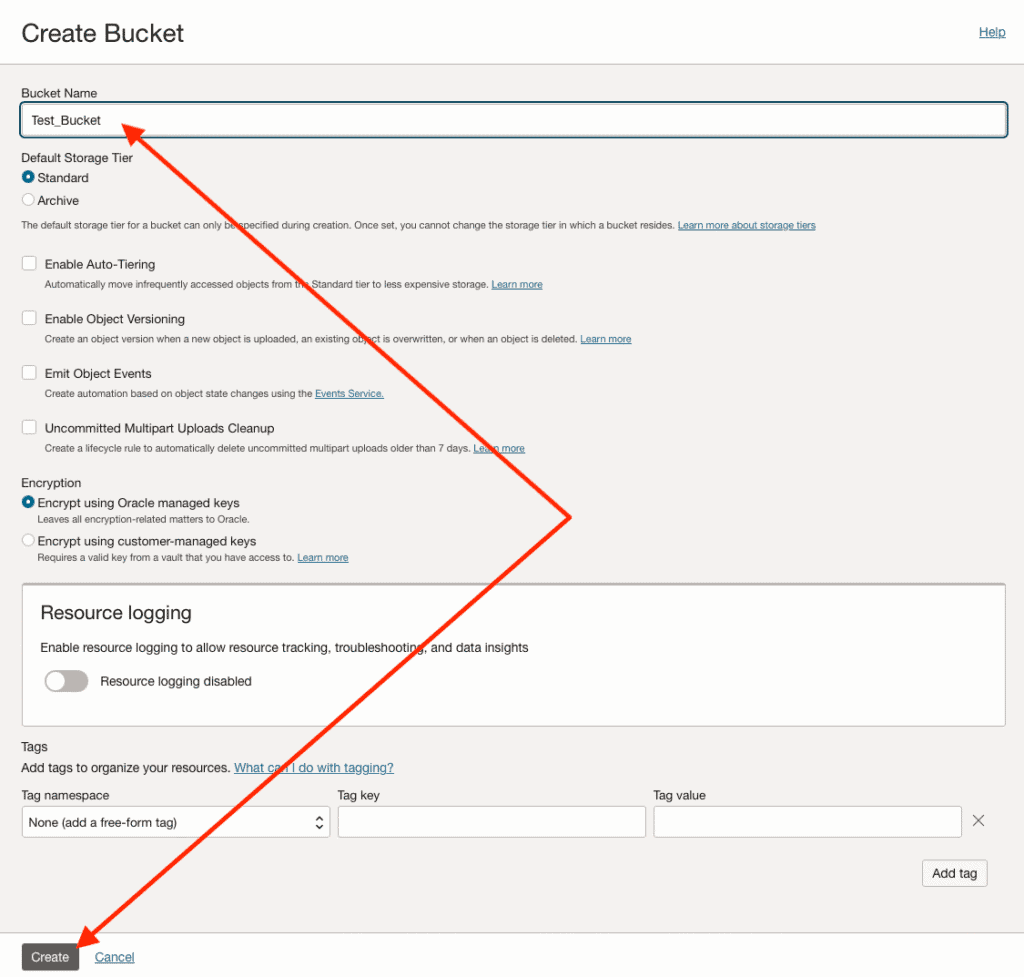
Now you can specify a name for your bucket, and then, click in Create:
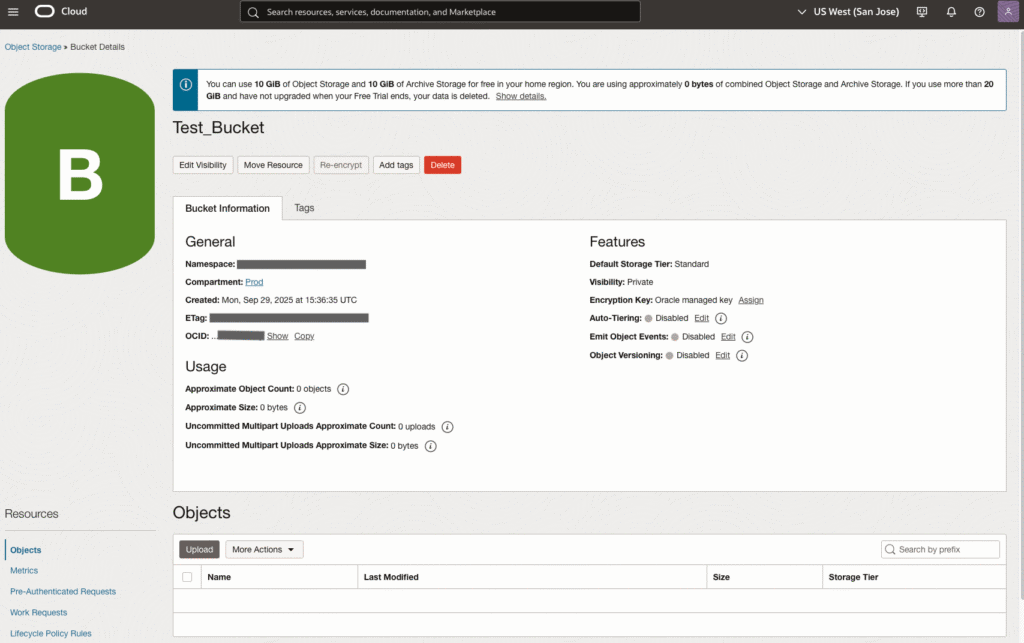
You can click in your bucket to see the contents:
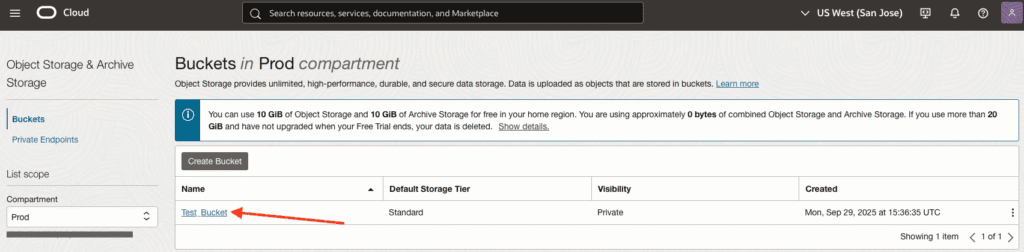
The screenshot below shows the bucket properties and its contents:
Hands-On Steps
Now, let’s install the OCIFS, as root, perform the following step:
[root@upgradelab ~]# dnf install ocifs -y
Last metadata expiration check: 2:14:18 ago on Mon 29 Sep 2025 01:22:30 PM GMT.
Dependencies resolved.
==========================================================================================================================================================================
 Package                           Architecture                       Version                                         Repository                                     Size
==========================================================================================================================================================================
Installing:
 ocifs                             x86_64                             1.2.0-6.el8                                     ol8_oci_included                               81 k
Installing dependencies:
 fuse                              x86_64                             2.9.7-19.0.1.el8                                ol8_baseos_latest                              82 k

Transaction Summary
==========================================================================================================================================================================
Install  2 Packages

Total download size: 163 k
Installed size: 373 k
Downloading Packages:
(1/2): fuse-2.9.7-19.0.1.el8.x86_64.rpm                                                                                                   904 kB/s |  82 kB     00:00
(2/2): ocifs-1.2.0-6.el8.x86_64.rpm                                                                                                       840 kB/s |  81 kB     00:00
--------------------------------------------------------------------------------------------------------------------------------------------------------------------------
Total                                                                                                                                     1.6 MB/s | 163 kB     00:00
Running transaction check
Transaction check succeeded.
Running transaction test
Transaction test succeeded.
Running transaction
  Preparing        :                                                                                                                                                  1/1
  Installing       : fuse-2.9.7-19.0.1.el8.x86_64                                                                                                                     1/2
  Installing       : ocifs-1.2.0-6.el8.x86_64                                                                                                                         2/2
  Running scriptlet: ocifs-1.2.0-6.el8.x86_64                                                                                                                         2/2
  Verifying        : ocifs-1.2.0-6.el8.x86_64                                                                                                                         1/2
  Verifying        : fuse-2.9.7-19.0.1.el8.x86_64                                                                                                                     2/2

Installed:
  fuse-2.9.7-19.0.1.el8.x86_64                                                          ocifs-1.2.0-6.el8.x86_64

Complete!
Now, create the Local Directory to be used by the Bucket when mounted:
[root@upgradelab ~]# mkdir /Test
As mentioned, we need to have enough space in disk to be used as the cache for the OCIFS Utility. All the files you copy to Bucket, will also be saved in the cache. I will use the /u01 itself to hold the cache. Let’s create the directory to be used as Cache:
[root@upgradelab ~]# mkdir /u01/cache
Now, it’s time to mount our Object Storage Bucket in the VM:
[root@upgradelab ~]# ocifs --cache=/u01/cache Test_Bucket /Test

[root@upgradelab ~]# findmnt -t fuse.ocifs
TARGET SOURCE      FSTYPE     OPTIONS
/Test  Test_Bucket fuse.ocifs rw,nosuid,nodev,relatime,user_id=0,group_id=0,default_permissions

[root@upgradelab ~]# grep ocifs /proc/mounts
Test_Bucket /Test fuse.ocifs rw,nosuid,nodev,relatime,user_id=0,group_id=0,default_permissions 0 0
If you notice, when you run ocifs utility, there is no output, but we confirmed that the Object Storage Bucket is mounted by using findmnt and running a grep for ocifs in /proc/mounts.
I will not show how to perform the TAR.GZ, so, I will create a simple file and show how OCIFS works:
[root@upgradelab ~]# ls -l /u01
total 32907840
drwxr-xr-x. 4 oracle  oinstall          40 Apr 30 16:31 app
drwxr-xr-x. 3 root    root              27 Sep 24 17:20 bucket.cache
drwxr-xr-x  3 root    root              25 Sep 29 15:38 cache
-rw-r--r--. 1 root    root        28731815 Sep 24 19:02 permissions.txt
drwxr-xr-x. 4 oracle  oinstall         151 Sep 24 19:42 software
drwxr-xr-x. 4 zdmuser zdm               36 Jun  2 21:09 zdm

[root@upgradelab ~]# ls -l /u01 > /u01/list_files
[root@upgradelab ~]# echo "---" >> /u01/list_files
[root@upgradelab ~]# echo "---" >> /u01/list_files
[root@upgradelab ~]# echo "ViniciusDBA Test OCIFS" >> /u01/list_files
[root@upgradelab ~]#

[root@upgradelab ~]# ls -l /Test
total 0
[root@upgradelab ~]#
[root@upgradelab ~]# cp /u01/list_files /Test
[root@upgradelab ~]# ls -l /Test
total 4
-rw-r--r-- 1 root root 493 Sep 29 15:41 list_files
Great! We created a file called list_files with the output of the ls -l command. After the file creation, we copied the file to /Test, which is our Object Storage Bucket.
Let’s confirm this in the OCI Console:
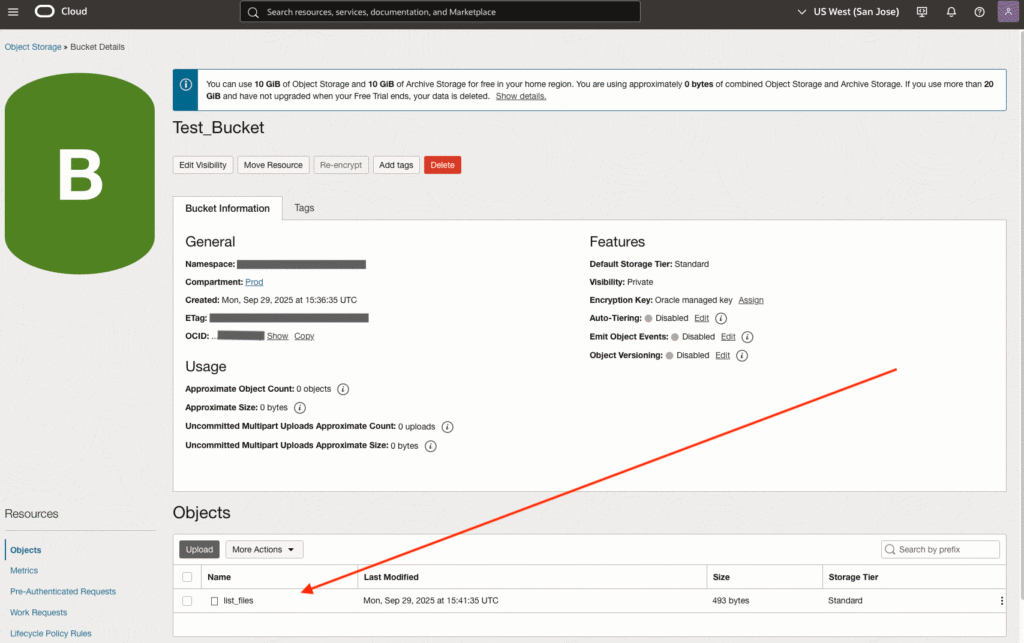
Great! Our file is there!
Let’s now create a PAR (Pre-Authenticated Request) to get the URL what we will use to copy the file to the new VM. I like to create a PAR because as my bucket visibility is Private, and a PAR will allow us to have a URL publicly available for our object.
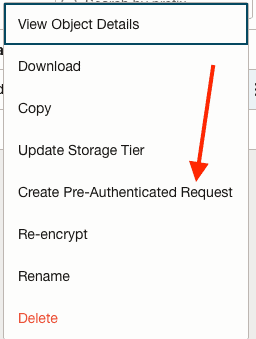
Inside the Bucket properties page, click the three dots in front of the list_files object:

Now, click Create Pre-Authenticated Request:
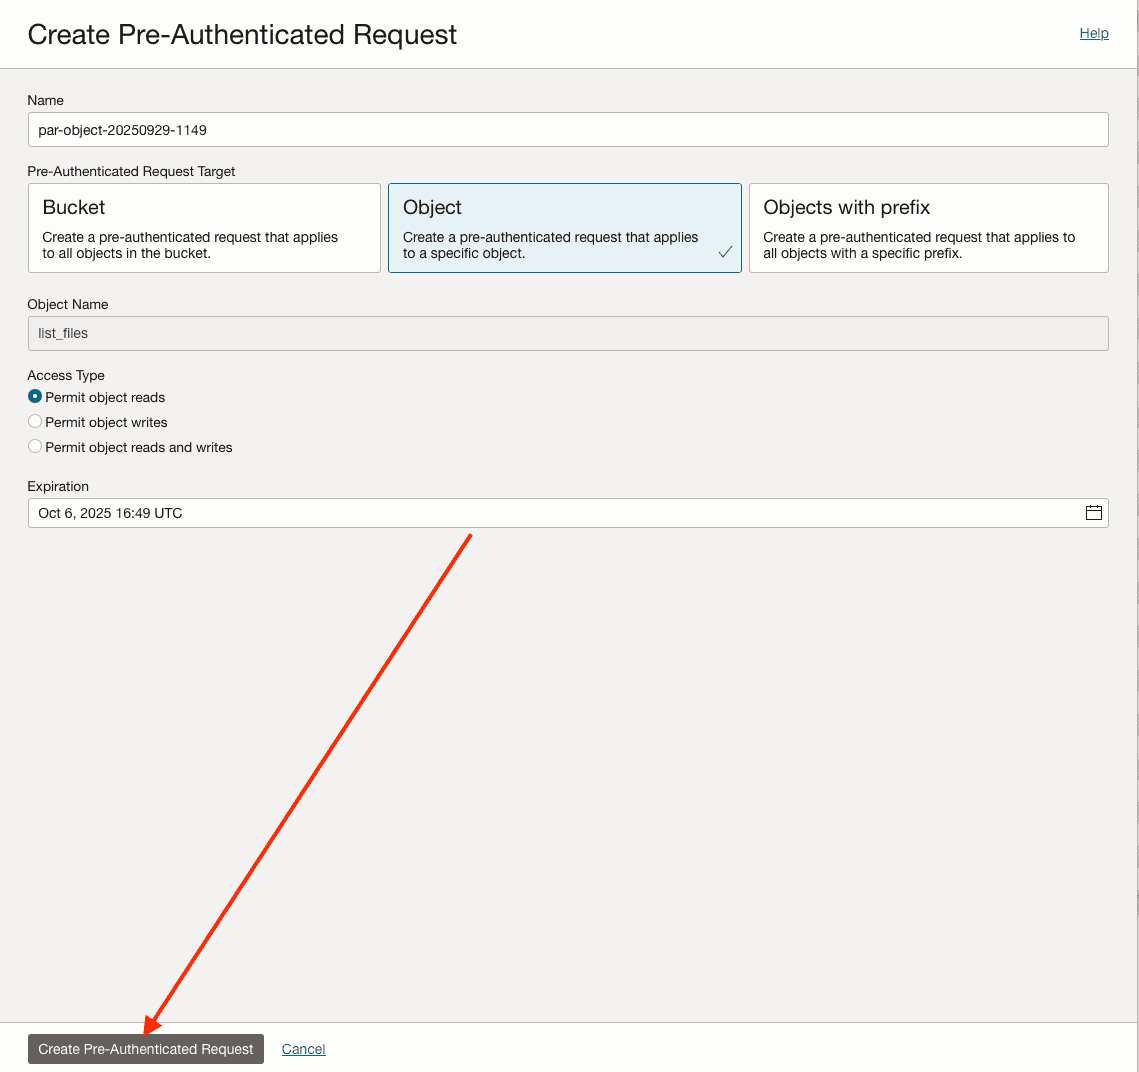
You can specify a name for your Object, I will keep the suggested name, you can also specify a target. Let’s keep Object selected, as we would like to create a URL for a specific file, you can also specify the type of access (I will keep it as read-only here), and the expiration date for the PAR URL. Click on Create Pre-Authenticated Request button:
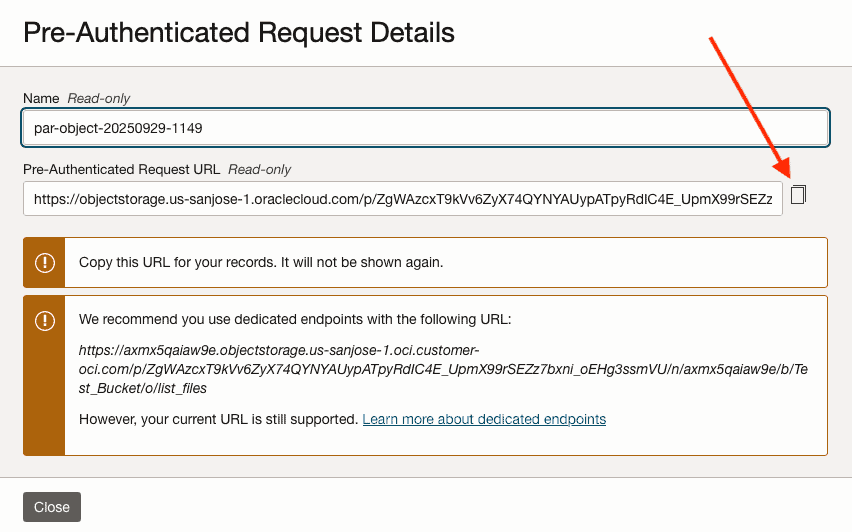
Now, a screen with the URL for your Pre-Authenticated Request will be displayed. Click in the Copy button:
Let’s try to download this file on our new VM (which has access to the Internet):
[root@new_lab /]# cd /u01

[root@new_lab u01]# ls -l
total 0

[root@new_lab u01]# wget https://objectstorage.us-sanjose-1.oraclecloud.com/p/ZgWAzcxT9kVv6ZyX74QYNYAUypATpyRdIC4E_ABCdEFHgi7bxni_oEHg3ssmVU/n/ki28s5qaiaw9e/b/Test_Bucket/o/list_files
--2025-09-29 16:50:36--  https://objectstorage.us-sanjose-1.oraclecloud.com/p/ZgWAzcxT9kVv6ZyX74QYNYAUypATpyRdIC4E_ABCdEFHgi7bxni_oEHg3ssmVU/n/ki28s5qaiaw9e/b/Test_Bucket/o/list_files
Resolving objectstorage.us-sanjose-1.oraclecloud.com (objectstorage.us-sanjose-1.oraclecloud.com)... 134.70.124.2
Connecting to objectstorage.us-sanjose-1.oraclecloud.com (objectstorage.us-sanjose-1.oraclecloud.com)|134.70.124.2|:443... connected.
HTTP request sent, awaiting response... 200 OK
Length: 429 [application/octet-stream]
Saving to: ‘list_files’

list_files                                      100%[====================================================================================================>]     429  --.-KB/s    in 0s

2025-09-29 16:50:36 (18.3 MB/s) - ‘list_files’ saved [429/429]

[root@new_lab u01]# ls -l
total 4
-rw-r--r-- 1 root root 429 Sep 29 15:47 list_files
Great! The file was copied to the new VM!
Conclusion
There are many methods to copy data between two tenancies. My main issue is that my old Tenancy was very limited in terms of available options. If I had full access, I could use any of the Cross-Tenancy methods to copy the block volume to my new tenancy.
There is no “best” solution being discussed in this post, I had an issue and I had to fix it by copying the content of my /u01 to my new tenancy. Using OCIFS for my issue and the restrictions that I had looked as the best option I could have.
References
- OCIFS Utility
- Object Storage Pre-Authenticated Requests
- Migrate Oracle Cloud Infrastructure volume data across tenancies
Hope this helps!
Peace.
Vinicius