Last week, Oracle announced the General Availability of Oracle AI Database 26ai for Linux x86-64 on-premises platforms.
Yesterday, I blogged about how to download the Oracle AI Database 26ai for Linux x86-64 using AutoUpgrade with a configuration file created by AutoUpgrade-Composer.
You can check it here:
Downloading the Oracle AI Database 26ai On-Premises using AutoUpgrade
Today, we will see how to create (install) a new Oracle Home for our latest version of the database!
OK, let’s do this!
So, first we’ll access AutoUpgrade-Composer: https://viniciusdba.com.br/autoupgrade-composer
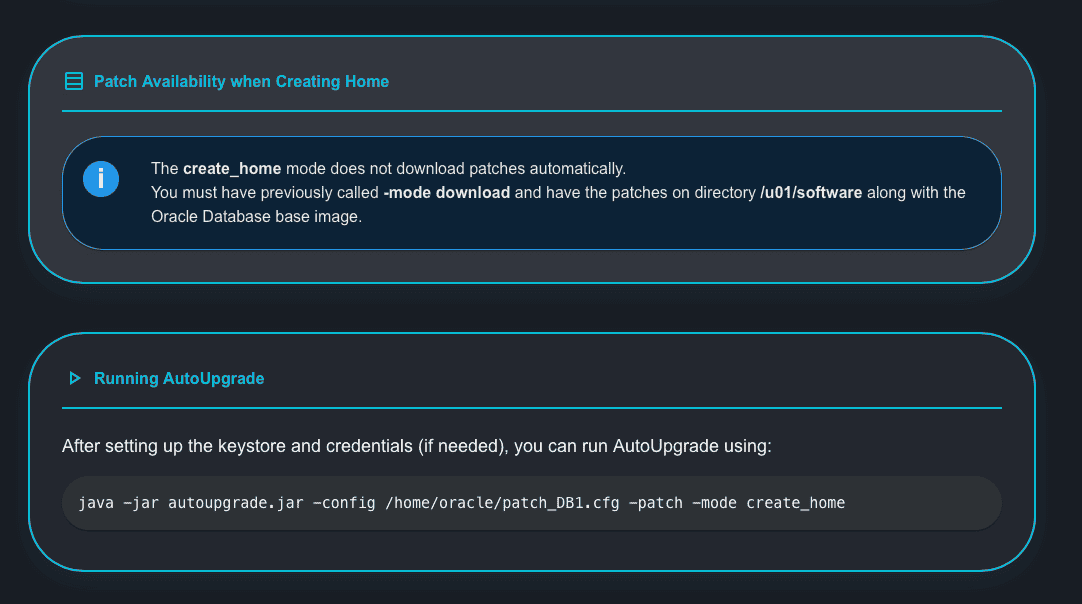
The Create Home Mode is one of the execution modes for the Patch operation.
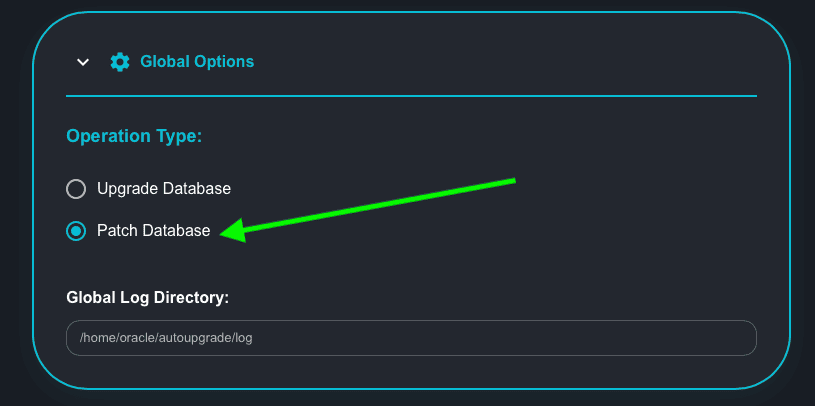
In the Global Options section, choose the option to Patch Database:
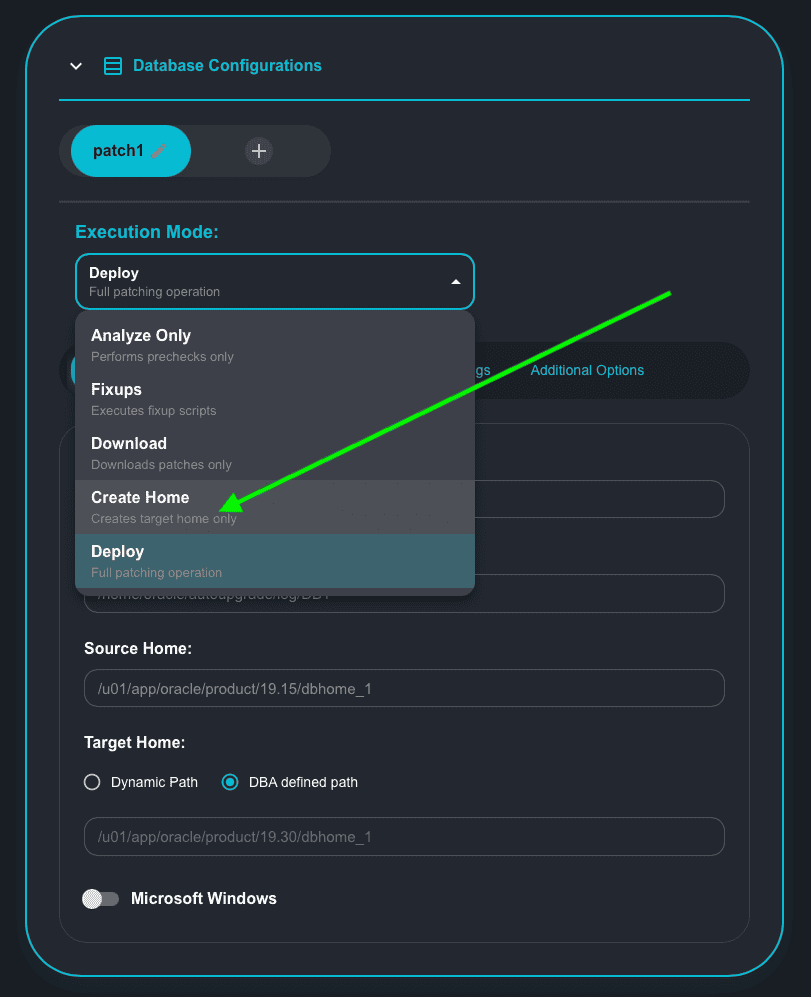
Now, click on the drop-down list for Execution Mode and choose the Create Home Mode option:
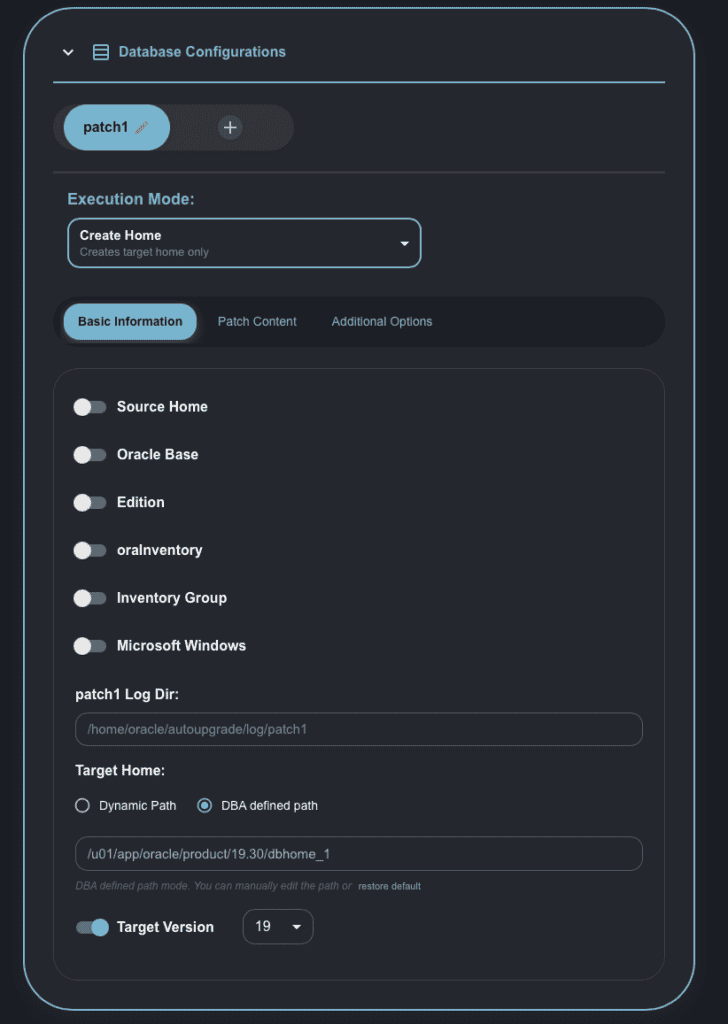
You will notice that, apart from Target Version, no other option is selected in this tab.
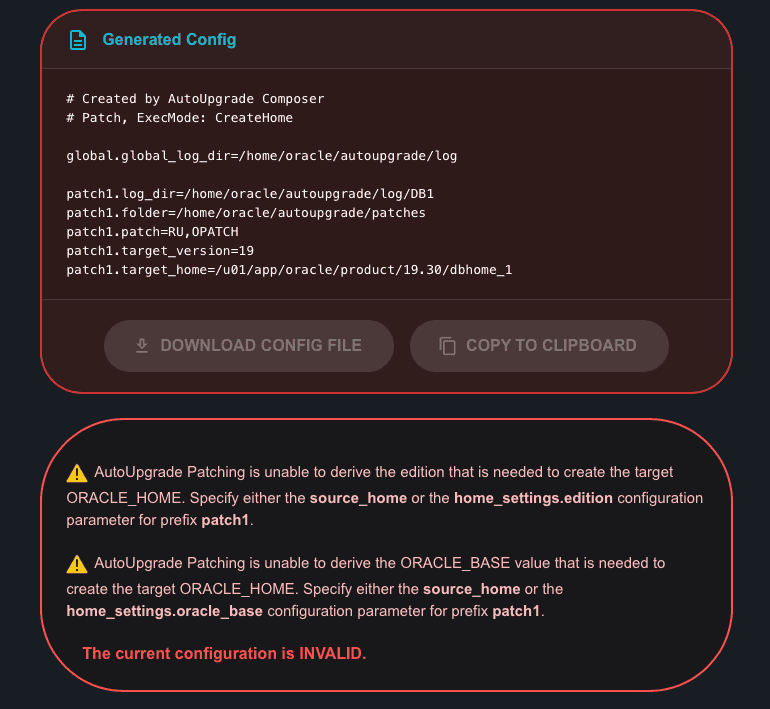
Because no option is selected, the current generated config is invalid, and if you try to run it using this config, it will lead to the same errors you are seeing on the screen:
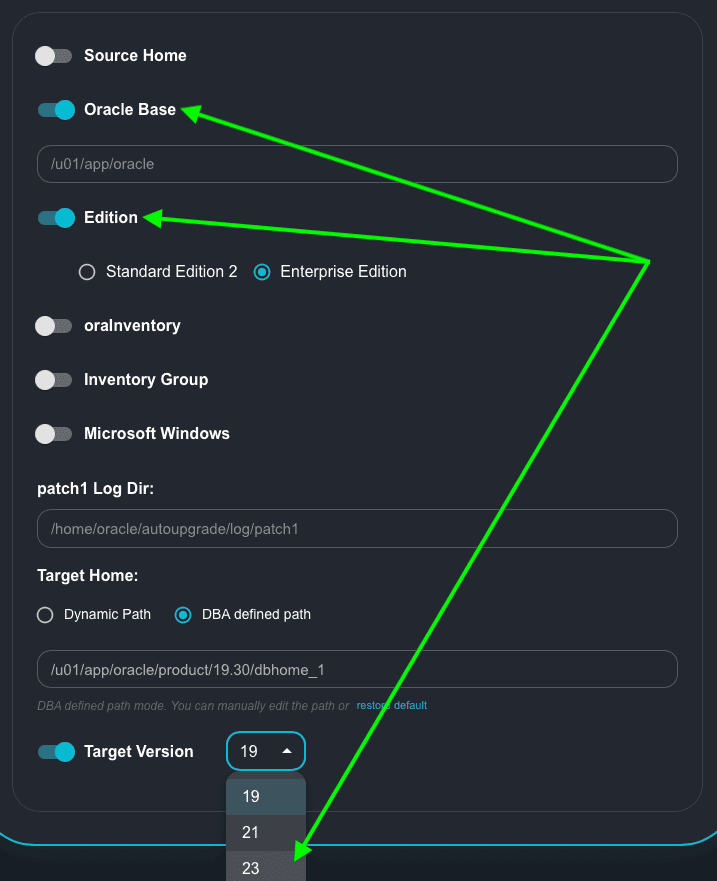
So, for this exercise, I am selecting the following options:
- Oracle Base: you can use a different path as per your environment.
- Edition: I will create a new Oracle Home for an Enterprise Edition DB.
- Target Version: I will change it to 23 – as our goal is to install the Oracle Home for 26ai (23.26).
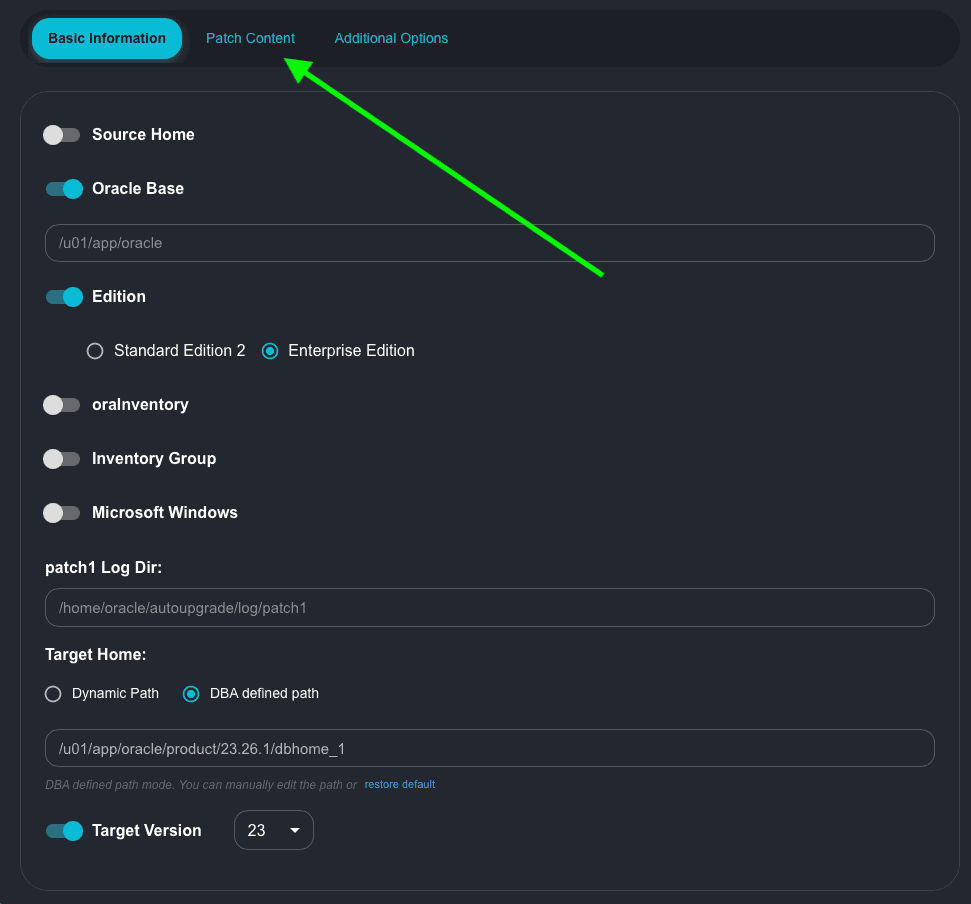
Now, click on the Patch Content tab to select which patches you would like to install/apply during the Create Home:
In the Patch Content tab, I’ve selected:
- RU
- OPATCH
You can select all the patches you want from the list and also add one-off patches if you want.
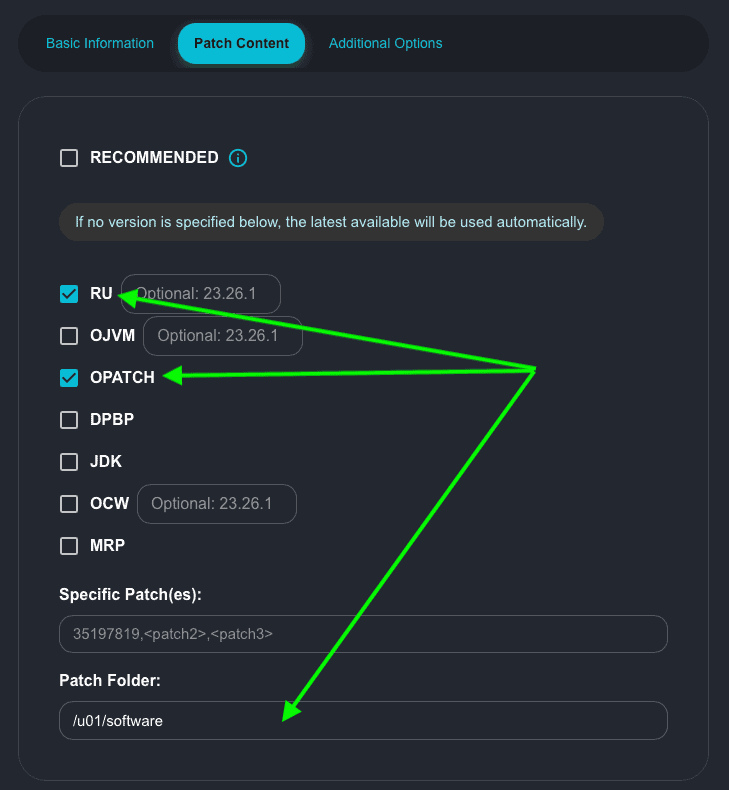
In my example, I am choosing a folder to store my patches after they are downloaded: /u01/software, because this was the folder where I downloaded the files in my last blog post. Make sure you select a folder where your patch files are present and that the user running AutoUpgrade has the right permissions to read the files.
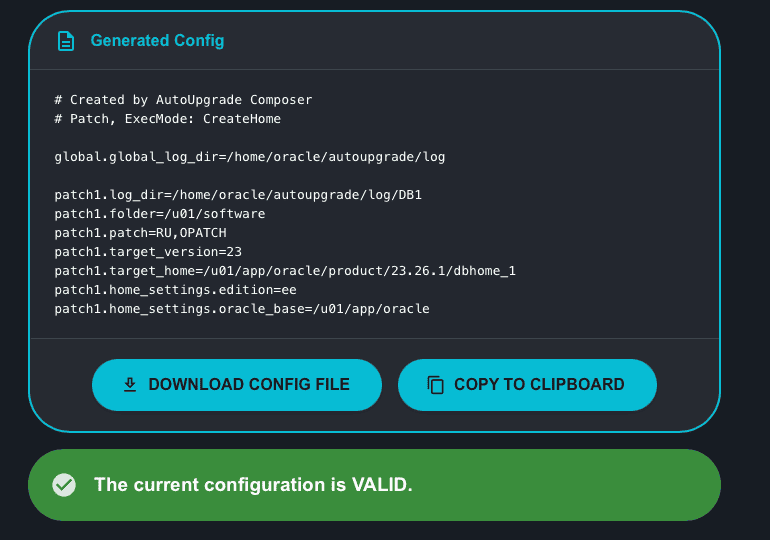
Now let’s check the generated config:
Continuing with the scroll, you have the instructions on how to run AutoUpgrade in Create Home mode. Notice that during the Create Home mode, AutoUpgrade will not download the patch files, so you need to download them before using the Create Home mode:
Let’s proceed.
I saved my configuration file as create_home26ai.cfg:
# Created by AutoUpgrade Composer
# Patch, ExecMode: CreateHome

global.global_log_dir=/home/oracle/autoupgrade/log

patch1.log_dir=/home/oracle/autoupgrade/log/DB1
patch1.folder=/u01/software
patch1.patch=RU,OPATCH
patch1.target_version=23
patch1.target_home=/u01/app/oracle/product/23.26.1/dbhome_1
patch1.home_settings.edition=ee
patch1.home_settings.oracle_base=/u01/app/oracle
Let’s now run the AutoUpgrade tool in Create Home mode to install/create the new Oracle Home for us (the output is truncated to make it easier to read):
[oracle@upgradelab ~]$ java -jar autoupgrade.jar -config create_home_26ai.cfg -patch -mode create_home
AutoUpgrade Patching 25.6.251016 launched with default internal options
Processing config file ...
+-----------------------------------------+
| Starting AutoUpgrade Patching execution |
+-----------------------------------------+
Type 'help' to list console commands
patch>
patch> lsj -a 10
patch>
+----+-------------+-------+---------+-------+----------+-------+---------------------+
|Job#| DB_NAME| STAGE|OPERATION| STATUS|START_TIME|UPDATED| MESSAGE|
+----+-------------+-------+---------+-------+----------+-------+---------------------+
| 101|create_home_1|EXTRACT|EXECUTING|RUNNING| 22:20:49| 4s ago|Extracting gold image|
+----+-------------+-------+---------+-------+----------+-------+---------------------+
Total jobs 1

The command lsj is running every 10 seconds. PRESS ENTER TO EXIT
+----+-------------+-------+---------+-------+----------+-------+----------------------+
|Job#| DB_NAME| STAGE|OPERATION| STATUS|START_TIME|UPDATED| MESSAGE|
+----+-------------+-------+---------+-------+----------+-------+----------------------+
| 101|create_home_1|INSTALL|EXECUTING|RUNNING| 22:20:49| 5s ago|Installing ORACLE_HOME|
+----+-------------+-------+---------+-------+----------+-------+----------------------+
Total jobs 1

The command lsj is running every 10 seconds. PRESS ENTER TO EXIT
Job 101 completed
------------------- Final Summary --------------------
Number of databases [ 1 ]
Jobs finished [1]
Jobs failed [0]
Jobs restored [0]
Jobs pending [0]

# Run the root.sh script as root for the following jobs:
For create_home_1 -> /u01/app/oracle/product/23.26.1/dbhome_1/root.sh

Please check the summary report at:
/home/oracle/autoupgrade/log/cfgtoollogs/patch/auto/status/status.html
/home/oracle/autoupgrade/log/cfgtoollogs/patch/auto/status/status.log
Great! The new Oracle Home is created!
Running the root.sh:
[opc@upgradelab ~]$ sudo /u01/app/oracle/product/23.26.1/dbhome_1/root.sh
Check /u01/app/oracle/product/23.26.1/dbhome_1/install/root_upgradelab_2026-02-02_22-41-02-444172643.log for the output of root script
Bonus:
I’ve created a single instance DB using DBCA. You can copy the response file from here:.
[oracle@upgradelab ~]$ export ORACLE_HOME=/u01/app/oracle/product/23.26.1/dbhome_1
[oracle@upgradelab ~]$ export PATH=${ORACLE_HOME}/bin:${PATH}
[oracle@upgradelab ~]$ cp $ORACLE_HOME/assistants/dbca.rsp /home/oracle
You will notice that the response file for DBCA is a little bit extensive. Below, I will show the parameters that I’ve changed in my test, it should good enough to have a CDB ai. As this is just a test, my passwords are not following the best practices. 🙂
Please, don’t remove the other parameters, just do the changes in the parameters you want!
responseFileVersion=/oracle/assistants/rspfmt_dbca_response_schema_v23.0.0
gdbName=TST3
sid=TST3
databaseConfigType=SI
createAsContainerDatabase=true
templateName=General_Purpose.dbc
sysPassword=oracle
systemPassword=oracle
datafileDestination=/u01/app/oracle/oradata
recoveryAreaDestination=/u01/app/oracle/fast_recovery_area
storageType=FS
characterSet=AL32UTF8
nationalCharacterSet=UTF8
I already have another DBs on this server: TST1, TST2, so, the warning that DBCA will show can be safely ignored.
Let’s create the DB:
[oracle@upgradelab ~]$ dbca -silent -createDatabase -responseFile /home/oracle/dbca.rsp
[WARNING] [DBT-10331] Specified SID Name (TST3) may have a potential conflict with an already existing database on the system.
   CAUSE: The specified SID Name without the trailing numeric characters (TST) may have a potential conflict with an already existing database on the system.
   ACTION: Specify a different SID Name that does not conflict with existing databases on the system.
[WARNING] [DBT-06208] The 'SYS' password entered does not conform to the Oracle recommended standards.
   CAUSE:
a. Oracle recommends that the password entered should be at least 8 characters in length, contain at least 1 uppercase character, 1 lower case character and 1 digit [0-9].
b.The password entered is a keyword that Oracle does not recommend to be used as password
   ACTION: Specify a strong password. If required refer Oracle documentation for guidelines.
[WARNING] [DBT-06208] The 'SYSTEM' password entered does not conform to the Oracle recommended standards.
   CAUSE:
a. Oracle recommends that the password entered should be at least 8 characters in length, contain at least 1 uppercase character, 1 lower case character and 1 digit [0-9].
b.The password entered is a keyword that Oracle does not recommend to be used as password
   ACTION: Specify a strong password. If required refer Oracle documentation for guidelines.
Prepare for db operation
10% complete
Copying database files
40% complete
Creating and starting Oracle instance
42% complete
46% complete
50% complete
54% complete
60% complete
Completing Database Creation
66% complete
69% complete
70% complete
Executing Post Configuration Actions
100% complete
Database creation complete. For details check the logfiles at:
 /u01/app/oracle/cfgtoollogs/dbca/TST3.
Database Information:
Global Database Name: TST3
System Identifier(SID): TST3
Look at the log file "/u01/app/oracle/cfgtoollogs/dbca/TST3/TST3.log" for further details.
Let’s check our DB:
[oracle@upgradelab ~]$ export ORACLE_SID=TST3
[oracle@upgradelab ~]$ sqlplus / as sysdba

SQL*Plus: Release 23.26.1.0.0 - Production on Mon Feb 2 23:17:23 2026
Version 23.26.1.0.0

Copyright (c) 1982, 2025, Oracle.  All rights reserved.


Connected to:
Oracle AI Database 26ai Enterprise Edition Release 23.26.1.0.0 - Production
Version 23.26.1.0.0

SQL> select instance_name,version_full from v$instance;

INSTANCE_NAME	 VERSION_FULL
---------------- -----------------
TST3		     23.26.1.0.0

SQL> show pdbs

    CON_ID CON_NAME			  OPEN MODE  RESTRICTED
---------- ------------------------------ ---------- ----------
	 2 PDB$SEED			  READ ONLY  NO
Hope it helps!
Peace!
Vinicius